
|
It's been some time since last blog post. It's been quite a busy last couple of weeks, so I have been concentrating on the final app project - The App Academy Code Challenge. Today is the last day of our course, and we are presenting our Code Challenge app. We are happy with the result so far and looking I wanted to share with you what we have so far at least.
0 Comments
Attributed String and Regular Expressions (RegEx). Full Stop. These two things have been occupying my mind for the first 3 weeks of our final project at iOS Bootcamp with The App Academy, and its been a love hate relationship. I will admit mostly hate in the beginning, but eventually (like most things) it becomes more clear the more you work on it. This is a too short article to explain this in full. Hopefully I can make a nice tutorial soon.
So what do I mean when I say: how to make text look good? Take an example of a ToDo-list:
Displaying this in with a String in a Label is not so difficult of course. But what if you want to make this ToDo-list visualise the items on it differently, for example like this:
This is a bit trickier to display in a Label with a String. This is where attributed strings comes in. An attributed string is a string can hold attributes for individual words and characters. With attributes I mean font size, background color, font color, font type, underlining etc. The easy recipe for doing this is as follows:
Doesn’t sound too difficult right? And it doesn’t have to be if you are only attributed one or two string. Then you can manually set the different attributes to the different ranges as you want. But if you want to automate this process so you can use it with multiple string, then it gets more complicated. For example if you want every word that is surrounded by *’s, for example *Get a job*, to be red and bold, then you need to have a way of searching the string for those *. This is where regular expressions come in. Regular expressions is a sequence of symbols and characters expressing a string or pattern to be searched for within a piece of text. This is too complicated to explain in one small article, but I’ll post some links to some good tutorials and websites that explains it better. Basically you can say use an expression that searches for *Important* then adds an attribute to that search result. The regular expression for this would be simply (*Important*), but this is pretty easy. Other examples of regular expressions are:
So you can see it can become quite complex, but there is also so much you can do with them. So the easy recipe from before now becomes a bit more advanced:
Instead of adding attributes to the matches you can also for example search and replace word within a string. For some more explanation about this look at these websites: http://www.regexpal.com/ is an easy tool to test out regular expressions to see if you can match what you are looking for. NSRegularExpression Tutorial and Cheat Sheet and NSRegularExpression Tutorial: Getting Started at Ray Wenderlich is a good place to start to learn about attributed strings and regular expressions
PHAsset is a class for fetching metadata about media that is located in your Photo Library. So if you are making an app to pin point all the locations of your favourite photos on a map, then you would use PHAsset to extract this data. PHAsset is part of the Photos framework, which replaced AssetsLibrary from iOS 9.0 onwards. So remember to import Photos to your code. The first thing you need to do is to fetch the asset or assets. You can choose between either collecting one asset (photo or video), an collection of them, all assets of a certain media type or a media with a certain identifier or URL. It is important to remember that this class won’t fetch the actual media (photo, video, audio), but the metadata of the media. After you them fetched the assets you can either gather metadata about them to use or you can also edit the metadata or the assets. So what data can you actually get after you have fetched the asset(s). Here is a quick list:
I previously wrote a tutorial on “How to read iOS Documentation” and there I used an example with fetching location and modificationDate from a older photo. Take a look at that here and see how you can fetch the metadata of an asset. I’ll also copy in a screenshot of my code that I used. This assumes that you have already chosen if you want to grab the picture from the Photo Library or if you want to take a new picture (hence the if else statement). 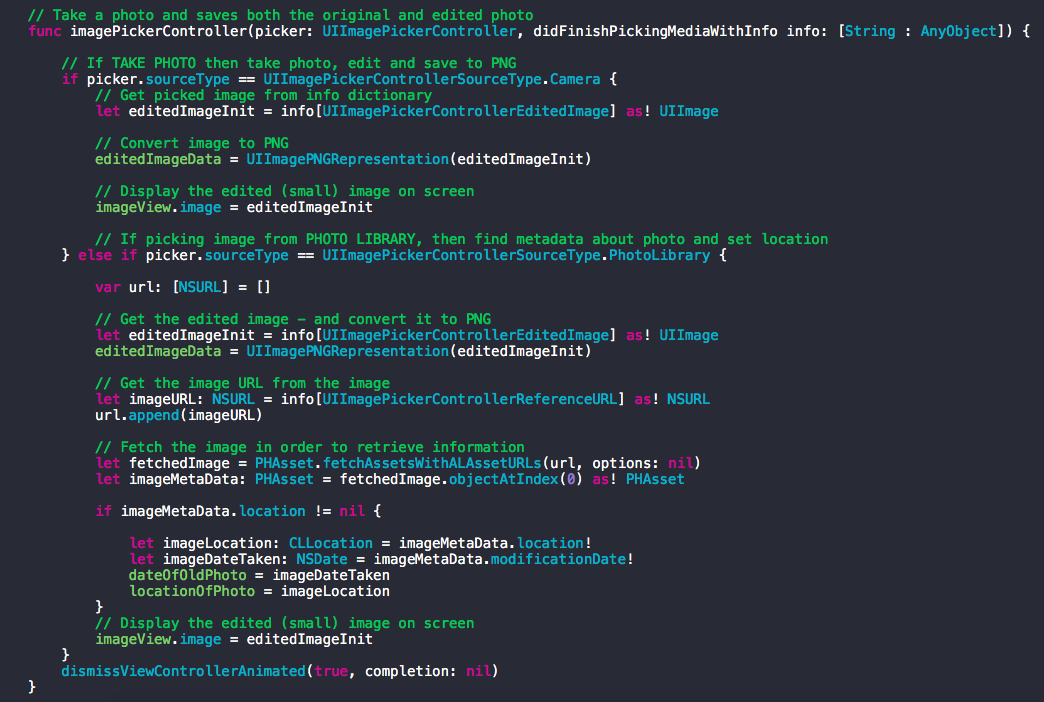 It's sunny in Amsterdam and like any respectable Amsterdammer (and Norwegian) I am enjoying the sun to the fullest.Today that involves:
When I first started thinking of being a programmer this was part of the lure. If its nice weather, take the laptop outside for a few hours to change the environment for a little bit. This was especially tempting while sitting in my old office at NAM in Assen. Only missing now is a cold beer towards the end of the day to cheers the new lifestyle!  Check out my tutorial on "How to read iOS Documentation". Everyone in class: "Teacher? Question: How do I do this and that and this? I can't figure it out!" This happens usually several times during the day. "Read the documentation". "It' explained in the documentation!". And then everyone starts pulling out their hairs in frustration, because HOW do you read the f****** documentation?
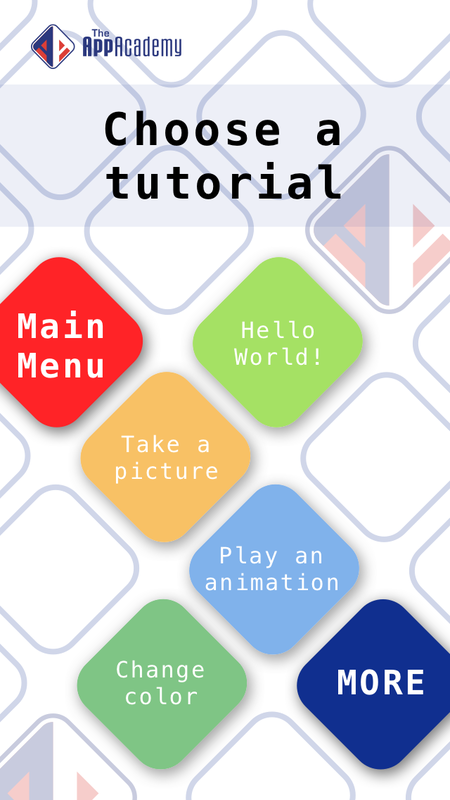
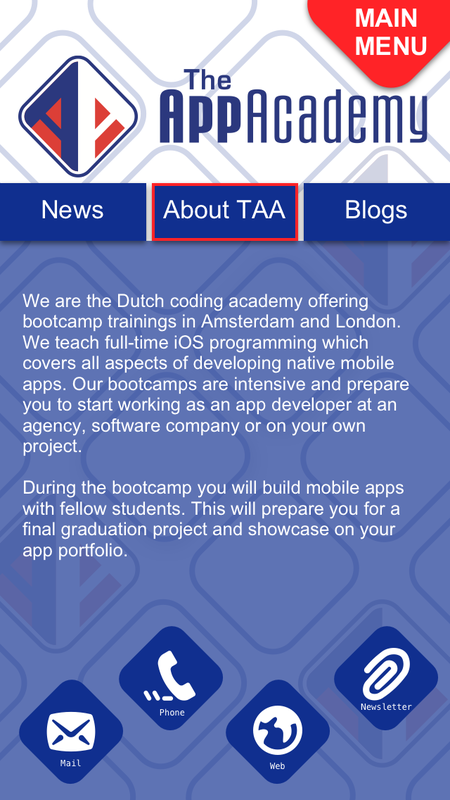
In the beginning it very hard to figure out how to use the documentation correctly to actually figure out what you need to do to in order to make "things" happen in your app. It is written in English, but it might as well have been written by Klingons. So therefore you end up using sites such as StackOverflow a lot search for solution. Which can help sometimes, but in the end, knowing how to read the documentation will get you a lot further! So this tutorial is my approach to reading and using the iOS Documentation. I am not saying this is the right way, the best way or the smartest way. It' just my way to make sense of the Documentation. We are not aiming to learn people how to code, but to get people interested in learning how to code. We went back to the drawing board with the new concept we agreed on with Martijn. After some thinking and drawing we came up with the prototype you see below. You can also test it out with Marvel with this link.
There are apps like Swifty and SwiftBites that does similar things, but we think our approach will be a bit different. We are not aiming to learn people how to code, but to get people interested in learning how to code. To do this we will make fun and interactive tutorials that will give everyone a taste of how it is to code, and most importantly, the feel of achievement when you see something you made appear on the screen of your iPhone. After we had finished our user-stories and prototype we started designing the user interface of the app. We skipped some important steps here that should be part of any app development, such as making wireframes, thinking about the user flow and more, but since we only have 5 weeks to complete this project we cut a few corners. Here is the design we came up with today, and we are quite happy with it so far. It incorporates the design elements of The App Academy, while at the same time it gives a fun and playful feel to it. You can also try out the prototype at Marvel with this link. What do you think?
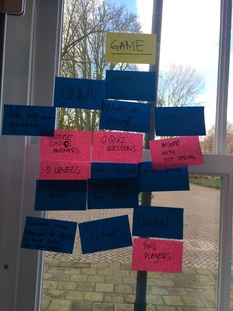
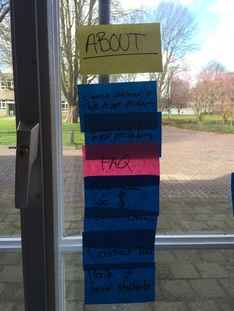
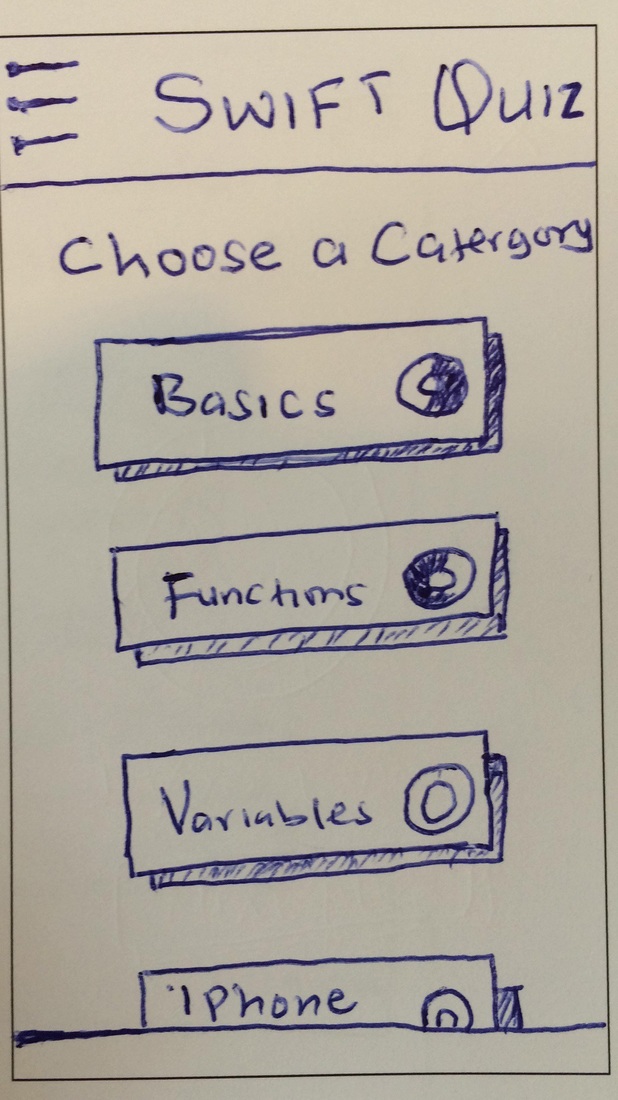
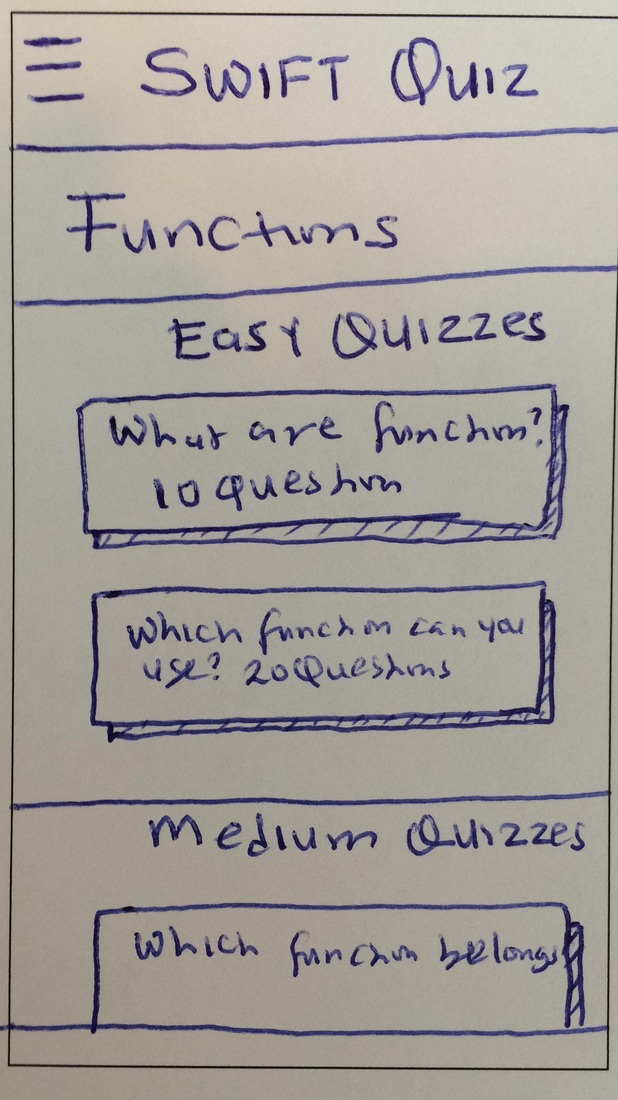
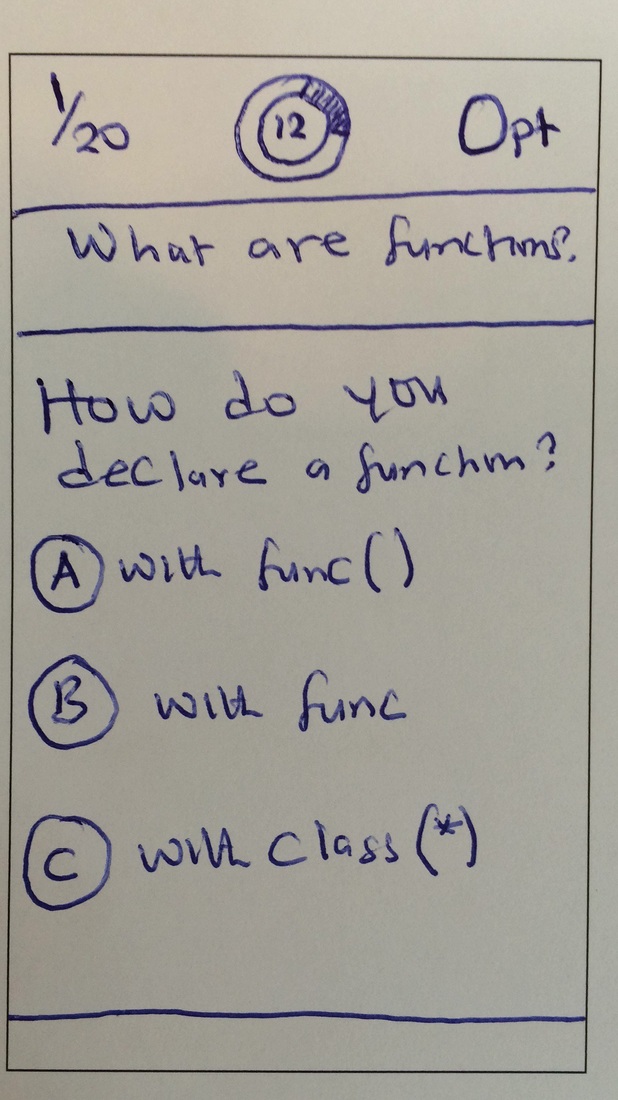
Make a coding quiz for people who are interested in coding. Let them test their knowledge, gain more knowledge and hopefully get them interested in further developing their coding skills This week we started our new and final project here at The App Academy. This will last for 5 weeks and we now have to work with a Product Owner that has an idea for an app he or she wants to build. We have three team and three totally different projects. I am working with Willy again, which I am very happy with. Our Product Owner is Mr. App Academy himself, Martijn Wuite. His idea was: make a coding quiz for people who are interested in coding. Let them test their knowledge, gain more knowledge and hopefully get them interested in further developing their coding skills. We used most of Tuesday for brainstorming. Which features does the app need, how should the quiz games be, would people compete against eachother, which backend would we use etc. Of course PostIts are mandatory for this type of brainstorming.
In the end we had a good idea of what type of app Martijn was looking for, so on Wednesday we started sketching some rough prototype sketches. These helped us think about the flow of the app, which information should be visible and which type of screens we need. We, and by we I mean Willy because I can't draw, sketched the screens and then used a prototyping app called Marvel to easily try out the app we had thought of. You can see the result with this link.
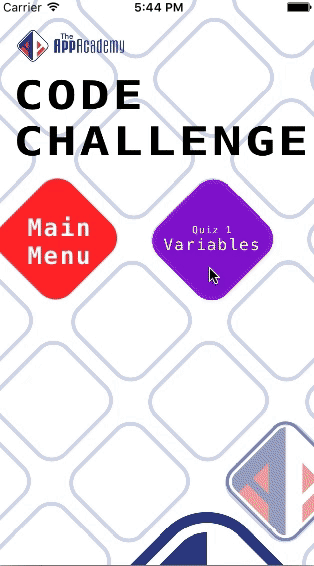
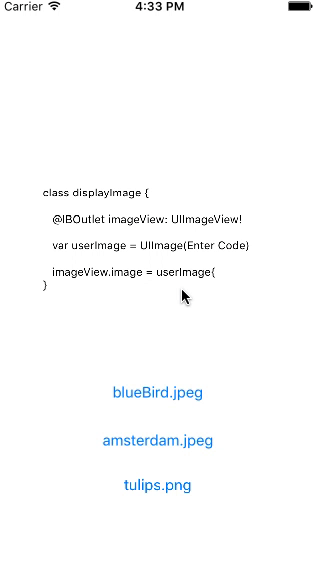
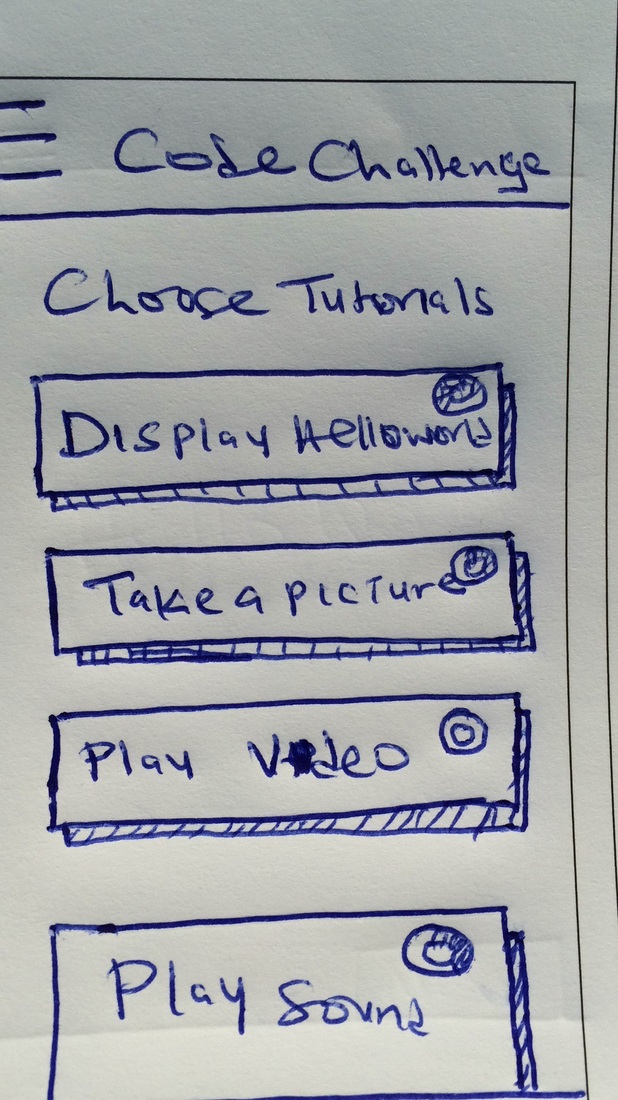
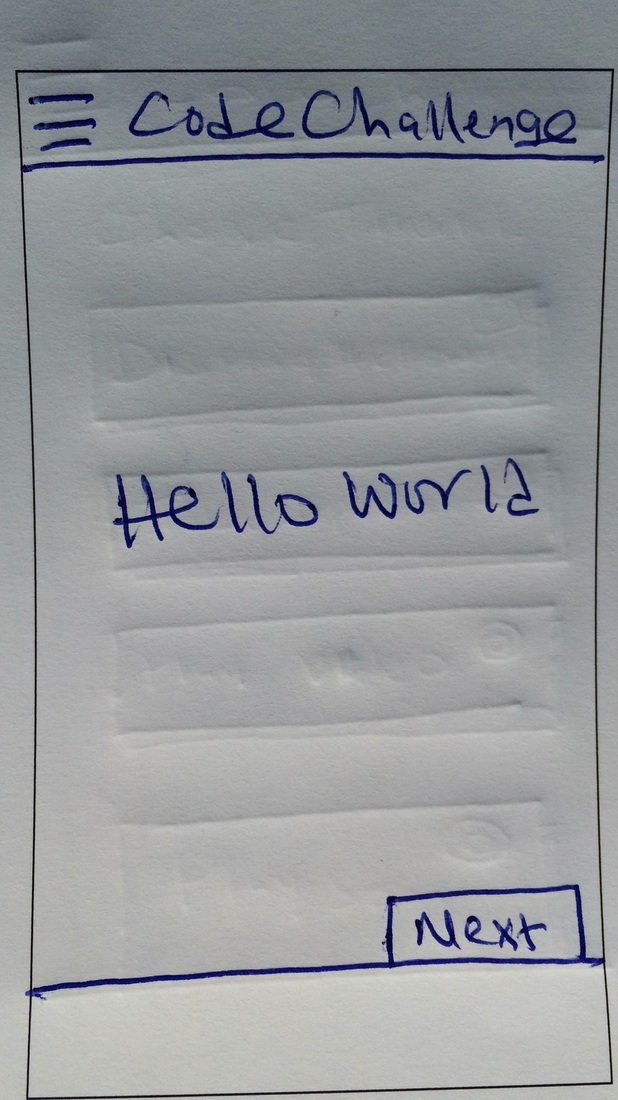
After we made the prototype we went to our Product Owner to discuss what we had made and our thoughts about the app. Although we liked the Quiz concept we had made we also felt like this would not serve the ultimate goal of the app that Martijn is looking for: to get more people interested in coding. Me and Willy had come up with another concept as well that we pitched to Martijn. We called it the Code Challenge, and it involved the user to finish short snippets of code which then would be visualized once they are done. For example to display a picture. The user would have to fill in blanks in a already half-completed code-snippet. If he or she would get it right, then the picture they chose would be displayed. We felt this provide a much bigger sense of accomplishment than a quiz would, and we think that it is by tapping into THIS feeling that we would get more people interested in coding. Martijn agreed with us and he liked the concept a lot. We learned that even though a Product Owner has a very good idea in his head, it does not always mean that that is the best or the only idea that will ultimately get him to his end-goal. So communication with the Product Owner is very important in projects like this. Which is why Agile and Scrum is so often used in the software industry. So then it was back to the drawing board for me and Willy with a new concept to work out. Below is the Code Challenge concept we showed to Martijn. 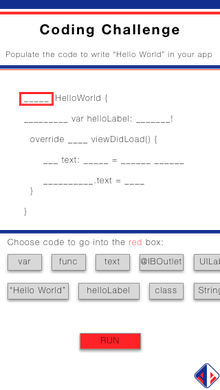  We finished our first app this week! The SoDutch App!! Me and Willy are really happy about the app. We managed to complete all the requirements and also to add some extra features we like. It is really satisfying to finally have made something that works, that is not from a tutorial or from a book. This was our idea and we made it! (not on the AppStore as this is a small project, but hopefully soon) "Of course you made a SoDutch app!" - my friends
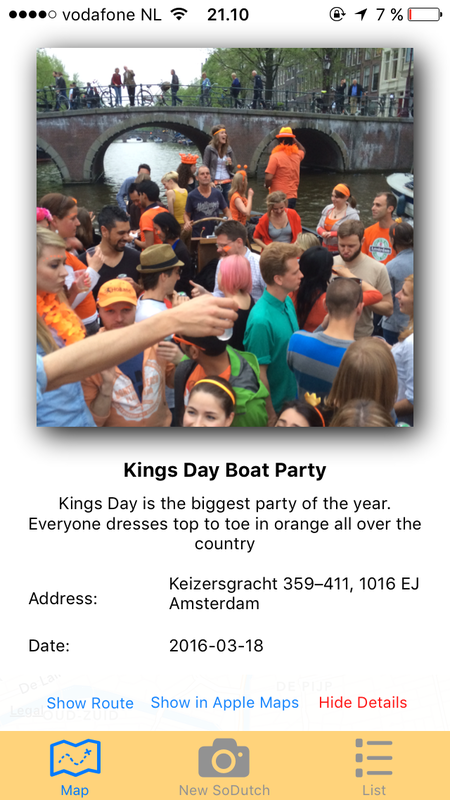
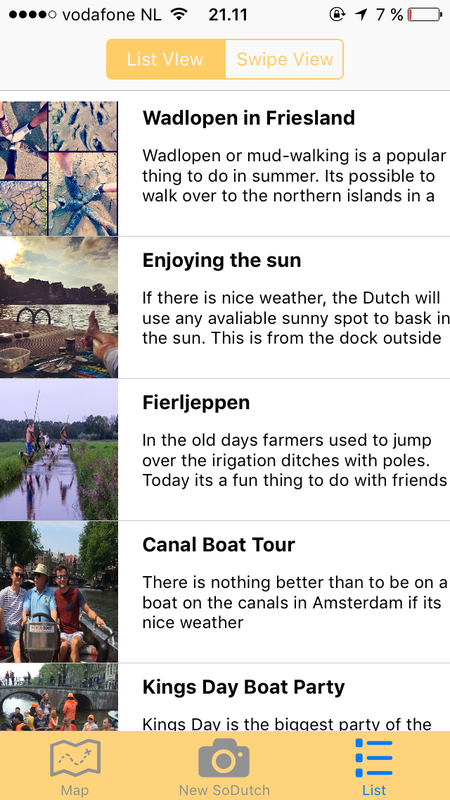
(Yes I know I need to charge my phone.....)
We only had two weeks to finish it, so its not the most advanced or beautiful app in the world, but hey, we are quite proud of it! Now we have one week of review, then we start a new project that will last for 5 weeks. Excited to figure out what the projects will be. Check out the SoDtuch app here - or just click on the Portfolio above in the menu. |
Archives
April 2016
Categories
All
|


 RSS Feed
